Understanding Vapor Barrier Installation
What is a Vapor Barrier?
A vapor barrier is a critical component in construction and building maintenance, designed to impede the escape or ingress of moisture through walls, ceilings, and floors. Typically constructed from durable materials like polyethylene or foil, vapor barriers are implemented in areas susceptible to humidity and water intrusion, such as basements and crawl spaces. By minimizing vapor transmission, these barriers play a crucial role in maintaining indoor air quality and protecting against structural damage caused by excessive moisture.
Importance of Vapor Barrier Installation
The significance of Vapor Barrier Installation cannot be overstated, especially in regions where humidity levels are prone to fluctuation. These installations are essential for preventing mold growth, preserving insulation efficiency, and protecting wooden structures from rot and termites. When moisture seeps into a building, it can compromise air quality, leading to health issues for occupants and increased energy costs due to ineffective HVAC systems.
Common Materials Used
Vapor barriers are primarily made from a variety of materials, each with its unique qualities. The most common materials include:
- Polyethylene Sheeting: This is the most popular choice due to its cost-effectiveness and robust moisture resistance. Typically available in various thicknesses, polyethylene sheeting is well-suited for various applications.
- Foil Backed Insulation: Foil barriers reflect radiant heat and also provide excellent coverage against moisture, making them ideal for basements.
- Spray Foams: These can act as both insulation and vapor barriers when properly applied, providing a seamless water-resistant layer.
Preparing for Vapor Barrier Installation
Site Assessment and Inspection
Before initiating the installation process, it is crucial to conduct a thorough site assessment. Begin by inspecting the chosen area for moisture sources, structural weaknesses, and existing insulation materials. Evaluating these factors will not only inform the installation strategy but also help identify any pre-existing issues that may need addressing, such as damaged insulation or drainage problems.
Essential Tools and Equipment
Having the right tools is essential for effective vapor barrier installation. Key tools and materials include:
- Utility knife or scissors for cutting the barrier material.
- Measuring tape to ensure accurate fit and placement.
- Sealant or adhesive compatible with the barrier material for sealing joints and edges.
- Staple gun to secure the barrier to structural surfaces.
Safety Precautions to Follow
Safety should always be a priority during installation. Ensure adequate ventilation if working in confined spaces, wear protective eyewear, and gloves when handling materials. Additionally, be cautious of any electrical wiring or plumbing that may be present in the installation area.
Steps for Effective Vapor Barrier Installation
Clearing the Installation Area
To achieve optimal results, begin by clearing the installation area of any debris, dirt, or existing materials that may interfere with the vapor barrier’s effectiveness. This may involve removing old insulation, cleaning any residual moisture, and ensuring the surface is as smooth as possible to guarantee a tight seal when the barrier is installed.
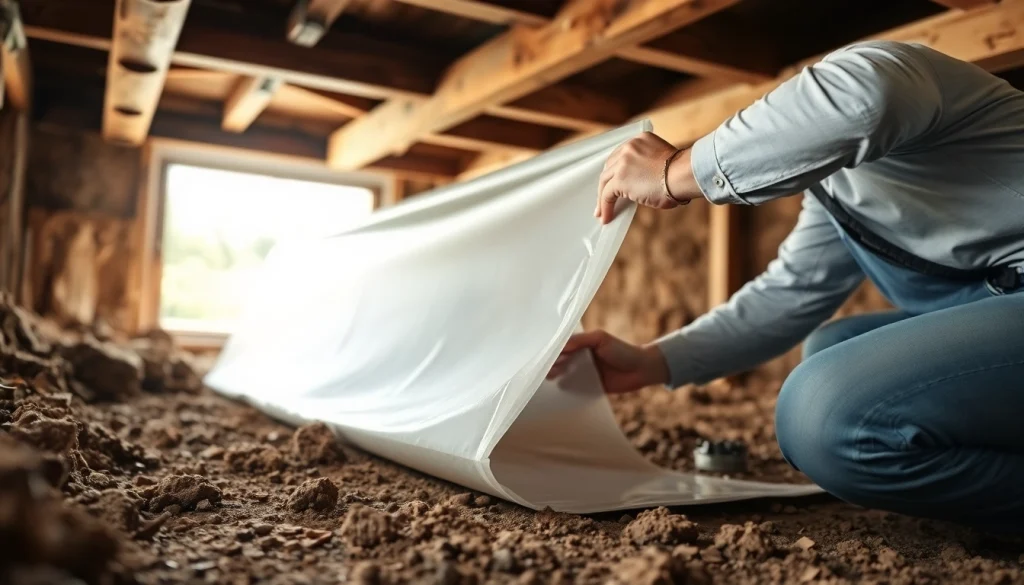
Properly Positioning the Barrier
Next, roll out the vapor barrier across the installation area. When positioning, it is crucial to overlap seams by at least 12 inches to create a continuous layer of moisture protection. The barrier should extend up to the walls, and may need to be cut into sections for efficient placement, especially in irregularly shaped areas.
Sealing and Securing Techniques
Once the barrier is in position, it must be securely attached to structures and sealed properly. Use a staple gun to fasten the barrier to wooden beams or other systems, ensuring that there are no gaps. At seams and joints, apply sealant or tape designed for vapor barriers to further enhance moisture resistance. Pay careful attention to the transitions between different materials—this is often where leaks can occur.
Maintenance and Troubleshooting
Regular Inspections: What to Look For
Routine inspections of the vapor barrier are critical to ensure long-term effectiveness. Look for signs of moisture intrusion, such as mold growth or condensation buildup. Check the integrity of seams, joints, and fastenings to verify that no gaps have developed over time. Additionally, consider the surrounding environment and ensure that drainage systems are functioning correctly to avoid excessive moisture in the area.
Common Issues with Vapor Barriers
Despite proper installation, several common issues may arise during the lifespan of a vapor barrier. These include:
- Moisture seepage through damaged or improperly sealed areas.
- Pest intrusion, particularly termites or rodents that may create breaches.
- Condensation buildup within the barriers themselves, indicating failure of the barrier’s efficacy.
Repairing Damaged Barriers
If any damage is found during inspections, prompt repairs are necessary to maintain adequate protection. Small tears or punctures can often be repaired with tape specifically designed for vapor barriers, while larger holes may require patching with new barrier material and adhesive. Always ensure that repairs do not compromise the overall integrity of the original barrier.
FAQs about Vapor Barrier Installation
How long does a vapor barrier last?
A vapor barrier can last from several years to decades, depending on the material quality and environmental factors. Regular inspection can help extend its life.
Do I need a vapor barrier in my crawl space?
A vapor barrier is essential in crawl spaces to prevent moisture buildup, protecting your home from mold and structural damage. It helps maintain humidity levels and improve air quality.
Can I install a vapor barrier myself?
Yes, if you have the proper tools and knowledge, you can install a vapor barrier yourself. However, professional help is advisable for optimal results, especially for larger areas.
What materials are best for vapor barriers?
Polyethylene sheeting is commonly used for vapor barriers due to its durability and effectiveness against moisture. Other options like foil-backed insulation also provide reliable moisture resistance.
How can I tell if my vapor barrier is effective?
Regularly inspect the area for signs of moisture or mold; a dry crawl space typically indicates that your vapor barrier is working effectively and preventing humidity buildup.